Updated: 05/17/2021This guide has been updated to industry specifications in 2021. How to Build a Wooden Fence That Will Last a LongtimeInstalling a new fence can be a very daunting task. This is a step-by-step guide to help you Do It Yourself. It is crucial to use the right materials to build the best wooden fence in the neighborhood. Use metal posts instead of wooden 4 by 4's. Metal posts with proper foundations are designed to outlive all of us. For pickets and planks, use cedar wood instead of pressure treated wood. Cedar naturally absorbs moisture and can last for 20 years or more with regular pressure washing, cleaning, and staining. Tools1. Spade Shovel2. Post Hole Digger 3. Pencil Point Digging Bar 4. Wheel Barrow 5. Miter Saw 6. Cordless Impact Wrench 7. Measuring Tape 8. Leveler 9. Triangle 10. Pencil 11. Knife Sharpener 12. Steel Stakes and Tie Downs 13. Roller CAUTION: Please practice extreme care. Check with your local authorities for gas, oil, water, electric, or other below ground utility lines before digging. Always use safety glasses, safety gloves, knee pads, and a lot of common sense. CALL BEFORE YOU DIG.Materials1. 2-3/8 by 2-3/8 8 ft. Metal Tube Post2. 2-3/8 Grip Tie and Cap 3. 1-1/4" Deck Screws 4. 2 x 4 x 8 Lumber 5. Appropriately-sized Pickets 6. Fast-setting Cement 7. Wood Stain Step 1: PlanningBegin by taking photos and detailed notes of the existing fence line's location. This is very crucial, as this will be your only guide moving forward. If you are building a new fence, mark where you want your fence to start and end. Make a rough sketch of the completed fence's shape and a general idea of how you want it to look like. Use your imagination. You can add more complex and interesting twists, like following the contour of a tree branch, working around a physical barrier, a waterway, etc. This guide will only focus on building a simple fence line that you won't need to touch for a very long time.Step 2: MarkingUse the spade to mark where you want your first post to stand. Maintain a gap of 7-3/4' to 8' between every fence post's center. Repeat this step until you have completely marked the entire fence line.Industry TipYou may mark your first post and directly proceed to step 3 and 4. Then, repeat the steps 2-6 for each and every fence post until you have completed your entire fence line. This makes it easier to make adjustments especially if you are not used to carpentry. Note: when digging near utilities or foundations, always call in for safe dig and only dig by hand for safety.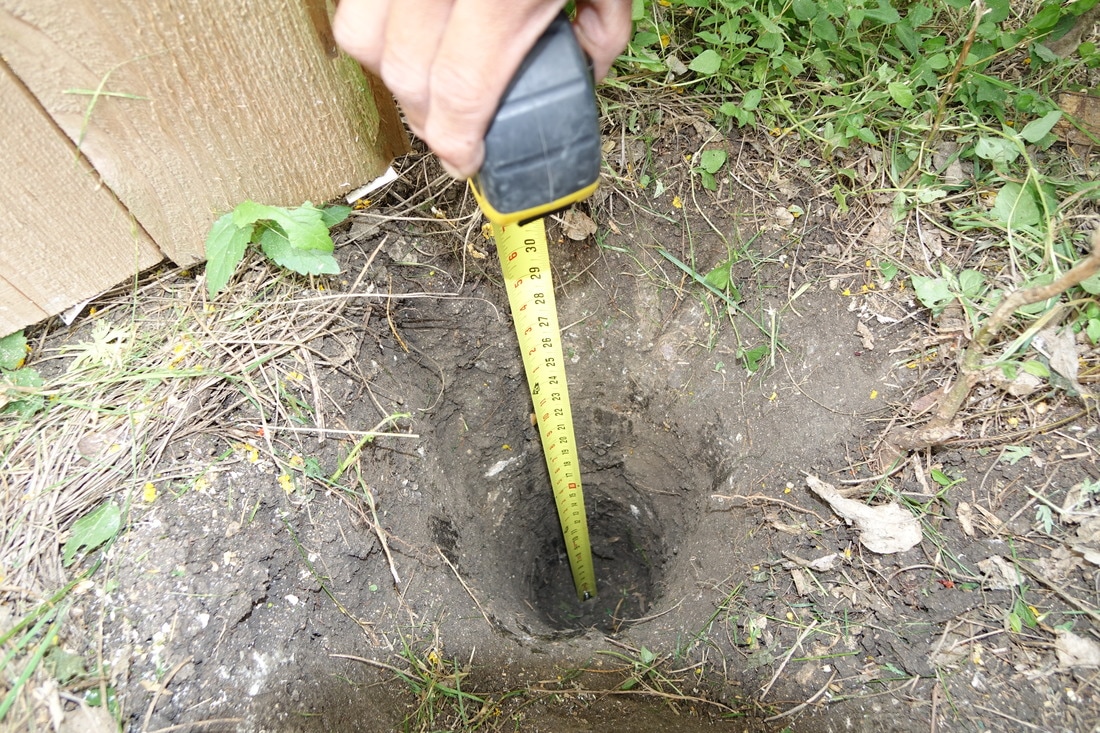
Step 3: FoundationRemember, take your time and be consistent. Some areas are much more easier to dig than others. Use your spade to start digging the marked locations. If the soil is too dry, consider watering until moist. Use your post hole digger to remove soil debris. Use a digging bar or pick to remove rocks or to break through boulders. Repeat until you have reached 24" in depth. For areas with considerable water overrun, such as those found in uphill/downhill slopes, consider adding another 6" to add gravel as extra drainage. Do not shortchange yourself. You have gone this far. Go by the book, and you will be pleased with the results. For fences taller than 6', you will need to dig deeper. As a general rule, the foundation's depth tend to be 1/3rd of the total height of the fence above ground. If tree roots are on the way, use your digging bar to breakthrough them. Note that moving the post to another area usually do not help. It is not uncommon for trees to have multiple main root lines not too far from where you have already dug.Industry TipCheck for post foundation alignment by either using a laser or a fish line. If these tools are not immediately available in your tool box, you may also eyeball the holes to get the approximate alignment and simply make small adjustments to line up the posts when you start setting them up. Also, make sure your spade, post hole digger, and pencil bar are sharp. They do get dull after a couple of holes.Step 4: Set-up PostsPlace your post in the center of the hole. Should your post alignment be off, consider digging some more on one side to correct the alignment. Take your time. Preparation is key for a successful fence project.Step 5: Mix CementOpen a bag of concrete and put it in your wheel barrow. Water and mix until you get a muddy texture. Avoid over watering as this will weaken the concrete. Make sure to mix the concrete thoroughly using your spade before pouring in the hole. Should you have added an addition 6" of drain, make sure to put the gravel in first, then compact the gravel using a piece of wood for even footing.Industry TipOnly open a bag you know you will use. Fast setting concrete may dry up in as little as 5 minutes. If it ever dries up while still in the wheel barrow, add more water and re-mix thoroughly.Step 6: LevelingLevel the post by making sure you have center bubble all the way around (front, back, and sides). For posts higher than 6' above ground level, tie down using stakes to maintain desired leveling. For 6' posts or shorter, the weight of the concrete is enough to hold it in place. Make alignment adjustments as needed before the concrete dries up.Step 7: CuringLet the concrete cure for 4-6 hours. Note that even fast setting concrete will have a hard time curing during wet and cold weather. If the weather is colder than 60F, consider waiting for a couple more days.Step 8: Grip Tie and CapInstall grip ties a foot above ground and at the very top of the fence post. Tighten up until snug. Place two or three levels. If you're going with three levels, place the third grip tie exactly in the middle of the top and bottom grip ties.Step 9: PlankInstall your planks by screwing one side first unto the grip tie and then the other. Use two or more planks between posts. Screw in 2 screws per side or 4 screws per plank.Step 10: PicketPlace the first picket a quarter inch above ground. Screw in your first screw. Level to center bubble before screwing in your second screw. Install 4 screws per picket. Repeat the steps until the entire fence line has been completed. You may maintain an eight of an inch gap between pickets by placing a nail in between or by eyeballing the gap. The gap, however, is not necessary. Your fence will be fine with or without it.Step 11: StainingUse your roller and carefully stain with even strokes. Thoroughly saturate one area before moving to the next. For best results, stain both front and back of the fence line. Repeat every 2-3 years.Follow these steps and you will be on your way to a great looking fence that will last a very long time. We hope our article has helped you better understand how to properly install a wooden fence that will last a long time. If you need professional lawn care assistance in Austin or around Travis County, please don't hesitate to contact us at 844-50K-LAWN (844-505-5296). DISCLAIMER: This general guideline is meant for educational purposes only. We will not be responsible for damages caused by you for following any of our suggestions. Every situation is different. Please consult 50K Professional Lawn Services LLC for professional help.
59 Comments
4/13/2017 03:55:50 am
Like all other fences, wood fence also needs maintenance when it is damaged or rotted out. It needs to be re stained or sealed. They often rot quickly because of the prolonged exposure to moisture in the soil. It is also a fact that without a stable post a fence may fall and it may need a full replacement within a quick interval. So, following maintenance tips must be adopted in order to take care up wooden fence properly. 1/14/2019 05:47:21 pm
Spot on! Always good to see good info out there and companies that do great work. Keep it up. 12/15/2019 05:05:19 pm
good info! thanks for taking the time to organize all of this 2/7/2020 03:34:14 am
I've been wanting to have a wooden fence installed in my yard because the kids from my neighborhood are intruding on my property. Although, I never knew that DIY fence installation can be this complicated, such as I would have to cure the concrete for four to six hours. Maybe it'll be best if I'll just hire a wood fencing service that'll be able to the job successfully. 3/6/2020 02:29:48 pm
Here's how I made the fence https://www.diyany.net/making-a-wooden-fence/ 7/20/2020 04:53:16 am
It is a wonderful article stating about how to build a wooden fence that will last a longtime. Content here based on facts right. Anyone searching for same topic may find their shelter here. I am sure many people will come to read this in future. Great blog indeed, will visit again future to read more!! Come across Groundworkslandscaping.co.nz and hope you can visit this too to get more information. 8/6/2020 11:34:08 am
Such a great article! So detailed and on point, keep it up guys! 9/12/2020 01:56:49 pm
I like that you explained everything in 11 steps. Thanks for the advice! 9/20/2020 10:14:35 am
I like that you explained everything in detail. Great work! 12/23/2020 01:51:52 am
The most popular woods used for fencing are pine and cedar, though cypress and redwood are also good options. Pine wood is common because of its relatively inexpensive cost and longevity. 1/15/2021 02:16:42 am
Start with pressure treated lumber for the posts and framing. Pressure treated lumber is chemically infused and will last significantly longer when exposed to moisture and wood destroying organisms in the soil. 2/21/2021 06:33:28 pm
I love the step by step explanation! Very good! Thank you! 3/15/2021 11:24:28 pm
This was really interesting. Definitely something to <a href="http://austindeckbuilders.net/"> consider </a> when it comes to this. Use exterior oil-based stain or latex paint, which will seal out moisture, prevent wood rot, limit the amount of weathering and extend the life of the wood. Choose a stain or sealant with a UV inhibitor to help keep the wood from turning gray. Let the wood dry for about a week before applying a stain or sealant. 3/17/2021 08:32:49 pm
I thought I could never understand how this works but your explanation is so plain that I understood the concept as clear as day! Good work! 3/18/2021 05:27:02 pm
Thank you very much for your Lawn tips. This in just the perfect time. Thanks a bunch! 3/23/2021 05:08:27 am
Hello, i think that i saw you visited my website so i came to return the favor? I’m trying to find things to improve my site!I suppose its ok to use some of your ideas!! 4/6/2021 05:27:22 am
It's my pleasure to find this amazing website who provides mostly unseen information about every single topic which is i really like it. 4/27/2021 08:46:41 am
Thank you for teaching us how to produce long lasting fences. Cheers! 6/30/2021 12:23:25 am
When setting posts in concrete, put a few crawls of rock in the lower part of the openings to further develop waste and shield the lower part of the posts from decay. Recollect that you don't need to pre-blend the substantial. Simply pour it in dry, pack it down, and pour water on the top! It's anything but a smart thought to develop the substantial one to two crawls over the level of the ground to hold the posts back from coming into contact with the dirt. Keep in mind, if the posts spoil and fall flat, the fence comes up short! 6/30/2021 12:25:47 am
Utilize three cross individuals in the outlining between posts rather than two, which will significantly build the strength of your fence and will likewise assist with restricting drooping. By mortising (scoring) the posts about ½" profound where each cross part appends to the post, it secures the cross individuals set up and furthermore makes developing the fence a lot simpler, especially in the event that you are working alone. This should be possible effectively with a portable saw. Simply make a few cuts adding up to 1 ½" in tallness and utilize an etch and sledge to take the pieces out. Never let your fence sheets contact soil which will permit them to decay; attempt to keep them 2" to 3" over the ground. 10/28/2021 01:48:42 pm
I like your fencing tips. I need to get a contractor. We need a steel fence built. 12/2/2021 06:22:41 pm
Nice article. Thank you for sharing. This is good if you are planning to do a DIY fence, a big help. If you need other services, please feel free to visit land surveying pittsburgh 6/9/2022 03:13:49 am
Great information and it is really very impressive, keep up the good work. Thank you so much for sharing. 7/20/2022 07:57:18 pm
I love that you talked that pressure washing could help preserve every fence because of their power to remove dirt. My cousin told me the other day that he was planning to have their fence fixed or have temporary fencing because of the harsh weather that damaged their fence, and he asked if I had any idea what would be the best choice to resolve it. I like this informative article, I'll tell him that he can consult fence repair services as they can provide more information about the repair process. 7/26/2022 10:36:16 pm
Reading how much you need done before a fence is properly installed really helped put me into the proper perspective. I thought these kinds of things were easy to do, but doing this half-hearted might lead to a very unstable fence that won't properly protect my family. If I can find a fence contractor in the area, I'll definitely ask them to help me do this process so we have a stable result. 8/4/2022 07:15:47 am
I want to get a wooden fence installed, but I want to make sure that it lasts a long time. It makes sense that getting a fence builder would be beneficial. That seems like a good way to ensure that it's put together in a way that will last a long time. 8/8/2022 10:42:54 am
It really helped when you elaborated on installing a wooden fence in your house and how it's important to lay a strong foundation first. My wife and I want to install a fence around our home to keep our garden protected, so it looks like it'd be wise to hire an expert for the job. Thanks for the information on how to build a long-lasting wooden fence. 8/20/2022 02:31:20 am
Yes I agree, Installing a new fence can be a very daunting task. I like all your tips about installing wooden fence that will last a longtime. Thanks for the great content! I appreciate all the hard work you do! Keep up the amazing work! I like that you pointed out that extreme care is needed as well as checking the area for any utility lines you might have on your property before the digging starts. I guess commercial fence installation professionals would already know about that and can prevent issues from happening. In that case, hiring their services when you need fences around your property is a good investment to save you from problems that can be costly to resolve. 1/3/2023 07:07:37 am
Your wood fence may have a brand-new look in addition to being able to last longer with the help of a high-quality fence stain and sealer. You may tint your fence either before or after it is put in. Some inexpensive fence stains employ solvents and pigments of poor quality that fade fast (and could be harmful to pets and the environment). A professional-grade fence stain made with industrial colors and paraffin- or mineral oil-based sealers is what you should seek out. 3/1/2023 05:42:01 pm
I like how you mentioned that using the proper materials and tools is important for a proper fencing outcome. My uncle told me last night that he is planning to buy fencing tools for the fencing development of their farm property project. He asked me if I had any idea what would be the best option for durable tools. Thanks to this helpful article, I'll be sure to tell him that he can consult a trusted fencing tool and equipment shop as they can provide information about tools. 5/8/2023 11:11:27 am
You made an interesting point when you mentioned that it is crucial to use the right materials when you are building a wooden fence. I would think that it would be a good idea to use high-quality timber that has been obtained by a reputable supplier. Working with an experienced fencing contractor seems like a good way to make sure that you are getting high-quality materials. 8/11/2023 12:03:51 am
Hey, thanks for sharing your thoughts on wooden fence . Your website has quickly become one of my favorites, and I can't get enough of your insightful blogs. 9/14/2023 04:47:42 am
Your dedication to providing valuable content for homeowners like me is truly commendable. Your blog is now my go-to resource for all things related to outdoor projects. Thank you for sharing your knowledge and empowering us to enhance our outdoor spaces. Your guidance is invaluable, and I look forward to more insightful posts from your team. 12/29/2023 03:04:11 am
If you are Looking For a Blog or Article Where You will get Information on How to Install Fence? Then You Should Visit this Step by Step Guide Blog on Fence Installing Leave a Reply. |